
How to Create High Resolution ICNS Files
Whether you’re creating a new icon for an app or just a replacement icon for fun, you’ll need to convert it to Apple’s icon image format—icns—before is can be used by OS X apps.
This format incorporates 5 different sizes and 2 different resolutions of your icon which are then displayed by the OS depending on which one works best in any given situation. Whilst I highly recommend that you provide all of the various sizes, if you don’t then the system will choose the closest representation of what it needs for you and scale it accordingly.
Exporting your icon
Before we can get started, you will need to have a version of your icon exported as a PNG in the following sizes:
- 16px x 16px and a 32px x 32px retina version
- 32px x 32px and a 64px x 64px retina version
- 128px x 128px and a 256px x 256px retina version
- 512px x 512px and a 1024px x 1024px retina version
We also need to follow Apple’s naming convention exactly. This means your final PNGs should be named as follows:
- icon_16x16.png
- [email protected]
- icon_32x32.png
- [email protected]
- icon_128x128.png
- [email protected]
- icon_256x256.png
- [email protected]
- icon_512x512.png
- [email protected]
Make sure that your icon is still crisp and recognisable, even at the smallest sizes. In most cases this means having to redraw them (or at least tweak and refine them) once you get down to about 32×32.
It is also worth keeping in mind that 16×16@2x and 32×32, 32×32@2x and 128×128 et cetera are not the same. The @2x versions replace the standard ones on retina devices so for example, your 16×16@2x should be a scaled up version of your 16×16 icon rather than the same as your 32×32 icon despite them having the same dimensions.
Converting to ICNS
Great! Now that you have all of your PNGs, let’s convert them into an ICNS file. Apple used to provide an app called Icon Composer as a part of Xcode’s developer tools to do this but it was removed in 2012 because of the addition of a larger icon size—1024px x 1024px for the new retina MacBook Pro’s—that it couldn’t convert.
We’re going to use a utility called iconutil which is already on your Mac and run through the Terminal.
Step one
Create a folder on your desktop and put all of your exported PNGs into it.
Rename the folder to “AppIcon.iconset” then click “Add” when asked if you are sure you want to add the extension to the end of the folder’s name.
Step two
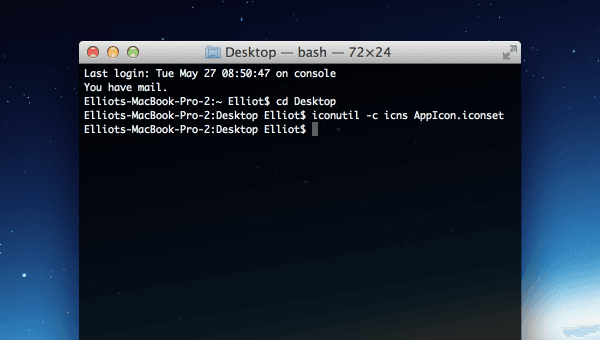
Open the Terminal and type (or copy and paste): cd Desktop
Press the return key then enter: iconutil -c icns AppIcon.iconset
Press return again and you’re done! You should now see a file called “AppIcon.icns” on your Desktop. If you double click it, it will open in Preview and you’ll see all of the different sizes you exported within the file.
Conclusion
As you can see, once you’ve exported all of the sizes for your icon it’s a very quick process to convert it to Apple’s icon image format. One of the advantages of this method is that it compresses the final file as well so once it has been generated, you don’t need to do anything else, it’s ready to go.
If you are uncomfortable using the Terminal then there are a few other solutions available including Felix Deimel’s open source replacement for Apple’s original Icon Composer app.