
A Guide to Optimising Photoshop Performance
Many of us have a love hate relationship with Photoshop. It’s an incredibly powerful tool that helps us get stuff done, it is however also undeniably temperamental. At times it can slow down or become unresponsive.
So today I’m going to try and help you optimise Photoshop based on your needs. Taking the time to tweak a few performance settings based on your workflow can make a massive difference.
As a UI designer, I work almost exclusively with files that have dozens and dozens of layers but are fairly small in size. I’ll show you how I personally have my performance options set as well as giving a few tips for those of you who work more with large documents and photography.
General Tips
Let’s start with some tips that will help your performance no matter what you use Photoshop for.
File Sizes and Dimensions
I work primarily with PSDs. To ensure compatibility with other applications and due to the design of the file type, Adobe has limited the format to a maximum of 2GB.
This is the first thing worth checking if things are starting to get slow. The file size can quickly build up if you’ve got all of the screens of your app in one PSD, especially when you start adding in things like Layer Comps on top of that.
Since version 14.2 of Photoshop CC, we have had access to a new feature called Linked Smart Objects. These make breaking up your app into multiple files much easier and a lot less hassle to keep up to date in the long run. Using them to break up designs is something that I have started doing and it really is a win win situation. Not only does it keep Photoshop snappy, it also allows you to be much more organised with your app’s screens.
Adobe has places limits on other file types as well. No file can be larger than 300,000 x 300,000 pixels and PDFs are limited to 10GB. Those of you who use Photoshop’s Large Document Format don’t need to worry though, the file size limit for those is 4EB (4 million terabytes).
The Efficiency Indicator
The is a handy way to keep track of the toll your PSD is taking on the system.
In the bottom left hand corner of your Photoshop window, there’s an indicator that can show you a variety of information about your current document. By default it is set to “Document Sizes” which will read something like “Doc: 12.5M/384.5M”.
By clicking on the ▶ symbol to the right of it, you can change it to show a variety of different information including “Efficiency”.
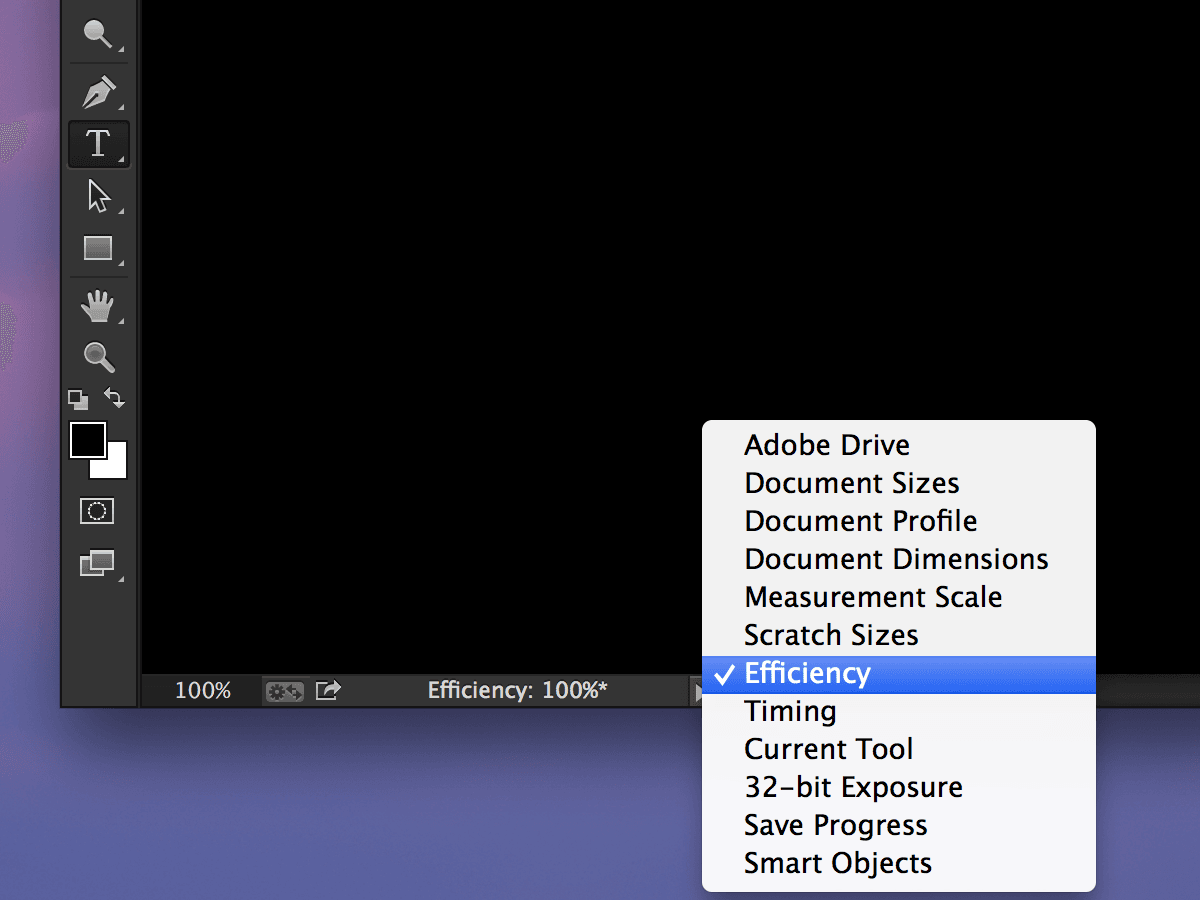
The indicator will now read something like “Efficiency: 100%”. When that value goes below 100%, it means that Photoshop has used all of the available RAM you have allocated for it and is now using the scratch disk. This will cause Photoshop to slow down.
If you see it drop below 90% then you should allocate more RAM to Photoshop in your settings (more on this later).
If you work in Full Screen Mode, the indicator is hidden. Fortunately, we can also access the information via the info panel.
This post was originally written for the Realmac Software blog. Check out the rest of it over there.

There are two ways you can easily free up some RAM:
- Purge “Undo”, “Clipboard” and “Histories” (Edit → Purge → All).
- Close any documents you’re not currently using.
Warning: Purging, whilst effective, cannot be undone. If you think there’s a chance you’ll want to undo some steps in one of your documents then only purge your Clipboard.
Mavericks Users: Disable App Nap
If you use a lot of automated tasks or actions in Photoshop, you might have noticed them run a lot slower when the app is in the background since you installed Mavericks.
The guilty party here is a feature Apple introduced in version 10.9 called App Nap. The idea is that it helps you save power when multitasking by detecting when an app is completely hidden behind other windows and consequently slowing it down. Whilst it works well in general, that’s not something we want for Photoshop.
Fortunately, there is an easy way to disable it for certain applications:
- Right click Photoshop in Finder
- Choose “Get Info”
- Check “Prevent AppNap”
Disable Thumbnails
Whenever you make a change to your document, Photoshop will automatically update the thumbnails of your layers currently visible in the Layers window.
Thumbnails are something I always have disabled anyway because it means I can see more layers in the window, plus I just think it looks better.
If you work with large files or move around a lot of layers, there is also a performance benefit is disabling them as well.
I think it’s safe to say all of us have experienced jarring layer nudging at some point or another, when your layers just can’t keep up with your arrow keys making it look like they’re moving in blocks with a slight delay rather than smoothly as you press your keys.
I found that disabling layer thumbnails helped this a lot. To disable them, click the ☰ button in the top right hand corner of your Layers window and choose “Panel Options”. Then under “Thumbnail Size” select “None”.
Photoshop Performance Window
This is where you can have the biggest impact on Photoshop’s performance. These settings all depend on how you use it, whether it be for editing photographs or designing UI’s.
My current setup is a 15″ rMBP with a 2.4GHz Intel Core i7 processor, 8GB of RAM and NVIDIA GeForce GT 650M 1024MB graphics. The settings I’m about to show you work well for me and how I use Photoshop but you might need to tweak them to suit your setup.
You can access Photoshop’s Performance settings window by going to Photoshop → Preferences → Performance… from the menu bar.
Memory Usage
Very simply, the more RAM you throw at Photoshop, the better performance you will get from it.
These controls allow you to choose how much RAM you want to allocate for Photoshop.
By default Photoshop will use 70%. If your setup has less than 4GB of RAM or you’re running 32bit Photoshop, avoid pushing it beyond this.
When I use Photoshop, it’s pretty much the only thing I have open so I push my “Let Photoshop Use:” setting right up to 98%. This works well for me and leaves just enough for things like Slack and Airmail. It might be too much for you though, start at 95% and bump it up or down a few percent over time until you find the right balance.
Available RAM: It’s worth noting that this is not your total amount of RAM as Photoshop subtracts the amount that is required by the OS.
History and Cache
Your History and Cache settings depend entirely on how you use Photoshop and optimising them based on your workflow is crucial.
Tall and Thin or Big and Flat?
Tall and Thin: This is the setting to go for if, like me, you work in documents with small dimensions and lots of layers. It will set your cache levels to 2 and your tile size to 128k.
Big and Flat: If you’re a photographer, this is the better setting to go for. It is designed for processing documents with few layers and large pixel dimensions. Big and Flat will set your cache levels to 6 and your tile size to 1024k.
Default: If you are unsure or if you feel like your usage of Photoshop falls somewhere between these two categories, just go for the default settings.
What are Cache Levels and Cache Tile Sizes?
The Cache Levels setting saves low resolution versions of the images to help Photoshop redraw the high resolution version faster. If you work with large files (dimensionally speaking) that have very few layers, you can consider putting this as high as 8. I have mine set to 2.
Photoshop processes data as tiles. The Cache Tile Size sets the amount of data Photoshop operates on at one time. If you use complex operations in Photoshop, a large Cache Tile size will help it process them faster. However, it does make onscreen operations slower. Again, it comes down to how you use the software.
History States
Every time you make a change to your document, Photoshop saves a snapshot of it allowing you to go back and undo steps. The value of your History States setting should be the maximum number of screenshots of your file you want Photoshop to store at any one time. Be careful though, as this uses your scratch disk, a higher value can impact Photoshop’s performance.
By default, the value is set to 20. This isn’t nearly enough for me personally as I like having a bit more leeway. Setting History States to 100 works best with my workflow.

Scratch Disks
A scratch disk is a drive with free memory that will be used by Photoshop for temporary storage when your system runs out of RAM to perform an operation.
The faster the disk you select, the better. Ideally, it should be an SSD. Dedicated scratch disks are especially recommended for people who work with large images.
### Graphics Processor Settings
Using a graphics processor not only increases performance but activates features and interface enhancements as well. Make sure that “Use Graphics Processor” is checked in the bottom right of your Performance Settings window.
To change your GPU settings, click on “Advanced Settings”. There are 3 options to choose from depending on how much of the GPU you want to use. The benefits and downsides of each option are detailed in the Advances Settings window.
Having the drawing mode set to “Advanced” works best for me. However, if you are finding painting to be slow it’s worth experimenting with your settings here.
All of the changes in your settings that we have just discusses will only take effect once Photoshop has been restarted.
This post was originally written for the Realmac Software blog.